Question Two: How Effective is the combination of your main products and ancillary texts?
Question Three- What have you learnt from your audience feedback?
I have uploaded a prezzie onto this question by using the embeded code but im not sure if it is coming up?
Question Four: How did you use Media technologies in the construction, research, planning and evaluation stages?
Throughout planning and creating our music video and ancilary tasks, I used alot of various media technologies which were all beneficial in different ways. Some of them I had used before but some of them were new to me, but i learned how to use them quite quickly and were great resources.
In each stage of my project I used different types of technology, such as: Google, Yahoo, Youtube, Powerpoint, Final Cut, Photoshop, InDesign, Microsoft word, IMac and many more. All of these technologies helped me along the way to creating the best product I could using all of my recources.
Research and Planning.

 throughout nearly the whole process, to look for different products bands similar to ours have created. I also used these search engines to
 look for ideas for our ancilliary tasks on the images tab on both engines.

Youtube was a very big part of our research and planning stage. It was used quite alot when anaylising bands music videos and getting ideas from them. We used youtube videos on the blog to show where we got inspiration from and to discuss how other bands show their brand image in their music videos.
During the planning stage, I used Microsoft office quite alot. I used microsoft word to create powerpoints to find out about who my target audience were and also to find out which was the most popular sub-genre. Microsoft word is very easy to use and we are all farmiliar with it, i created a questionnair very easily, being able to addphotos and change the colour and font of my text. Aswell as using microsoft word, I also used microsoft excel to produce graphs of my findings from the questionnaire, which i found was a very clear way of displaying my findings. Excel lets you choose different types of graphs to display your findings in different ways so that they don't get boring to look at.

I used powerpoint alot during my R & D stages. I created powerpoints to display the top 20 albums of all time and to show brands with similar brand images to the one we wanted to create. Powerpoint is very easy to use, you can add clips, pictures, text and change the colours on each slide. It displays your work in a very organised and fun way and is very easy to understand. Powerpoint is quick and easy to use to display ideas.

I used slideshare to upload powerpoints i had created during my research as it converted powerpoints so that I could upload them onto the group blog. I found slideshare very beneficial to use as it is very simple, it is easy to convert the powerpoint and does it very quicky and efficiently. This is the first time I have used slideshare but i quickly learnt how to use it.
 We first used blogger in our research and planning stage but we used it throughout all of our project. Blogger is a free blog site where you can create your own blog to showecase your work. I had never used it before but found it very easy to use and beneficial when showing ideas to the rest of the group. It looks very professional and is organised so you can find the exact post you want to very quickly. You can upload texts, videos, photos to blogger which makes it a very interesting way of displaying your work.


Producing
When actually producing our video, we used a number of new media tecnhologies that we hadn't used previously in the research and development stage. All of the technologies we used in this stage were all crucial in creating our music video.


 Photoshop was equally beneficial to use when we were produced our ancilliary tasks. It is also a very advanced programme but I had used it before so I already knew how to use it breify. I easily got the hand of it and got to know the different tools that would help me such as: colour too, size tool, gradient tool and the weight tool. Aswell as these, i used the crop tool to crop the photos to fit into the frame and a sharpener tool for the one of the magazine advertisments to sharpen up the photo at one end, which gave a great effect.
 Photoshop was great to use to add colour gradient to a photo. Using photoshop I could tint the photo to whatever colour I wanted from the spectrum. I changed the colour of my photos using these different colour lines to increase/decrease contrast etc. I used this tool too add a brown colour gradient over the photo you can see to show a 'realism' and 'gritty' effect, this worked really well and looked alot better with this added onto it, it helped give off conotations of our bands brand image.

With the colour gradient tool, I also managed to tint this photo with a pink colour over my actress. I decided to do this as this is the colour that i have used on all over my anciliarys so I thought it would be a good idea to feature it in this one. I think it really helps to carry on the consitant house style form all of my other anciliary tasks. I also used photoshop to fade the writting at the top of the photo, this worked really well as it helped the writing to blend into the photo so it looked more professional. I also faded the writting on the girls top to make it look like the writting was really written onto her top, which i thought worked very well.


Imac was also a very important resource in our research and development. Imac has softwear such as final cut on it which we created a practice video on, which was very beneficial to us. Imac is excellent to use and is very fast, I picked up how to use final cut quicky and think that is a great tool to be able to use as we used this to edit our final video.

I used this camera for my resarch and planning stage and then for the rest of my project. I used it to take shots of potention actors and actresses that we could use for our music video. This was an excellent tool to use and we could take photos of our candidates and then diccus as a group what we thought. This camera was excellent to use thorughout the whole process, as it took fast shots but at the same time very clear shots.
After we had used this camera, we used a 'fire wire' to upload the photos from the camera onto the computer to postonto our blog. All we had to do was connect it to the camera and the computer and press 'select' and it uploaded all of the photos we wanted. It was very easy to use and a useful tool.
During the later planning stages, we used this college video camera to get trained up onto how we use it and how to film. It was very easy to use and easy to capture footage with, it was also not too technical so we all grasped how to use it very quickly.
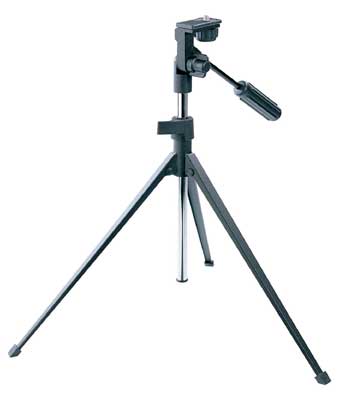
We used a tripod as well as the camera in the planning stages so that we knew how to use it to our advantage with a camera. We found out how to attach it to the camera and how to use it so that the camera was still when filming. I found the tripod very easy to use and we used it in the later stages of actually producing our music video. It really helps you to keep the camera still when filming and you can change the height in which you put the camera at which I found very beneficial.
When planning our music video, we had a full lesson in this studio to get farmiliarised with everything. We practiced filming in this studio and using different back drops for different effects. We also used the different lights and different hights and angles to see which we liked the best. I think this was very worthwhile as it means we knew exactly how to use everything, once it came to producing our actual video.
When actually producing our video, we used a number of new media tecnhologies that we hadn't used previously in the research and development stage. All of the technologies we used in this stage were all crucial in creating our music video.

When producing our video, final cut was definatley the most useful technology we used and we wouldnt of been able to produce our music video without it. We uploaded all of our footage onto the blog and we were free to edit our video in different ways. To import the footage into final cut, we imported them into the browser and then pulled all of the footage we wanted onto the timeline shown in the photo. After we had put all the footage onto our time line, we used the 'razor' tool to cut out all the footage that we didnt want to use as we filmed quiet alot of footage. Once we had done this we had to 'render' the rest of the footage so that we could play it in the viewer.
 Aswell as being to edit on Final cut it also let you colour grade over your footage. I thought this was a very good tool to use and worked very well. It let you pink from a range of different colours and you could increase/decrease the colour to suit you. In the music video, I added over a pink gradient over this viynl playing which really helped to keep the consitant house style that is seen in all of my ancilliaries. It was really easy to do and i feel that it fits in very well.
 In final cut, you could add and delete different layers. This was very helpful to us as it meant you could put different footage onto the different layers so that I could focus on one piece of footage at a time. You could also 'lock' different layers when you werent using them to make sure that the footage you were not edited didn't get deleted by accidnet. Once i had found out how to use the different layers, they were a really beneficial tool throughtout the process.


InDesign was a very important softwear to use throughout our production process. I had never used it before but found it very easy to use and i used it to help produce all of the ancillaries. It is a very advance softwear which means that it was quite technical and you could use it to look very professional. It had alot of helpful tools in it which really helped me to make the ancillary tasks look professional and help to keep a consistant house style.

This featured on the right hand side of the screen of InDesign and was used for colour swatches. It has a list of all of the different colours that I had previously used which was beneficial as I knew exactly what colours I had used and didnt have to spend time trying to find them again. Using the colour swatches meant that i could experiment with different colours on the spectrum to make sure i got the colour perfect. Aswell as swatches, this box had a tab called 'layers' on it. This tab was very useful when cutting things out in photographs and moving them to different layers, you could also lock the layers to make sure that they didn't get deleted when they weren't being used.
I found this Bob Dylan cover on the internet and took inspiration from it for our front cd pannel for one of our ancillary tasks. Using InDesign I manged to use a template that I took of google, i managed to add colours and move the different boxes to take resembalance of this Bob Dylan cover. It was quite easy to use and the advanced zoom button on InDesign really helped me to colour the pink in without going over the lines. We really liked this bob dylan cover alot as it shows him being a 'rebel' by the use of smoking and the different shots on the cover. We wanted to re-create this in our own front cover, so i added photos of our actor and actress smoking to create the same effect. It worked very well as i could rotate and change the size of the photos to fit the boxes perfectly.
 Photoshop was equally beneficial to use when we were produced our ancilliary tasks. It is also a very advanced programme but I had used it before so I already knew how to use it breify. I easily got the hand of it and got to know the different tools that would help me such as: colour too, size tool, gradient tool and the weight tool. Aswell as these, i used the crop tool to crop the photos to fit into the frame and a sharpener tool for the one of the magazine advertisments to sharpen up the photo at one end, which gave a great effect.
  Photoshop was great to use to add colour gradient to a photo. Using photoshop I could tint the photo to whatever colour I wanted from the spectrum. I changed the colour of my photos using these different colour lines to increase/decrease contrast etc. I used this tool too add a brown colour gradient over the photo you can see to show a 'realism' and 'gritty' effect, this worked really well and looked alot better with this added onto it, it helped give off conotations of our bands brand image.
With the colour gradient tool, I also managed to tint this photo with a pink colour over my actress. I decided to do this as this is the colour that i have used on all over my anciliarys so I thought it would be a good idea to feature it in this one. I think it really helps to carry on the consitant house style form all of my other anciliary tasks. I also used photoshop to fade the writting at the top of the photo, this worked really well as it helped the writing to blend into the photo so it looked more professional. I also faded the writting on the girls top to make it look like the writting was really written onto her top, which i thought worked very well.
I used this zooming presentation editor for one of my qustions for my evaluation. I decided to use this as it is a very different way of showing your work and it looks really interesting to watch. I had never used it before but got used to using it. It lets you add text, clips, videos and photos onto a presentation and then lets you edit it. You can zoom in and out very far which helps you display your work in different areas so it looks professional. You can then link up you different sections of texts or photos into a timeline so that the slideshow moves on to exactly what you want it to.
Overall after completeing our music video and ancillary project, I feel that we have been very sucsessful and everyone we have produced has been to a very high standard. I enjoyed created the music video the most as I filmed almost all of the footage for it and it was really good editing this footage in different ways to be creative. Using all of the different media technologies I feel have all be benefical to the creation of our project and even though some have caused problems, we have overcome this and learnt from the mistakes we made. All of our anciliares were produced to a very good standard and even though they all featured different things, the honsistant house style we used help them all to come together and link up. After we had produced our music video, we got our media class to give us audience feedback and all of the feedback we recieved was positive. Everyone said that our work was to a very high standard and that our editing techniques were very creative and different from the editing they had seen in other music videos, which is something that we initially wanted to achieve. The whole of our group brought different skills into the group which helped us to strive in everything that we have produced. I am very happy with our work and think that all of the time we spent researching, planning, filming, producing and editing our work definatley paid off.

